Winter Wonderland Flower Arrangement

Floristry is all about design colour and harmony, so when you are creating an arrangement you must always have these things in mind. Having a theme can also make life a lot easier!Certain times of year lend themselves to certain types of colour and winter is no exception. When we think of winter we think of white snow, ice and freezing conditions. Certainly in the typical winter picture postcard towns in Austria and Switzerland, everything looks so sparkling and bright.
There is absolutely no reason why you can’t recreate that fresh icy feeling in your floral designs. White can be a difficult colour to work with as it is so stark. It’s a very marked contrast with darker colours and can look too contrived. However if you stick to just white with metallic or clear crystals the effect can be absolutely stunning. Add a few feathers or some ribbons to give movement and texture then you have a design that has the real “wow” factor.
The main thing to always remember is not to “overcook” it. White is a very simple colour and it doesn’t need a lot to look amazing. But if you do find white too much as a single colour then there are plenty of off-white coloured flowers that can just take the edge off and still give you the same effect.
How to Create an Ice White Winter Wonderland Design
This design is perfect for a winter wedding and it certainly incorporates that “wonder” factor. You can hang these beautiful cornets of flowers from thin wire, from the ceiling and even decorate them with twinkly fairy lights – very romantic; or use them as chair backs or pew ends at a ceremony venue. Change the colour and they can be used at any time of year.Materials
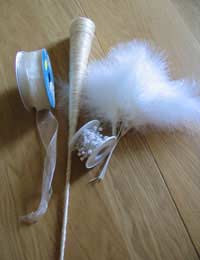
One cornet ( these do come in different sizes available from florists’ wholesaler) floral foam; florabond; white feathers; five white roses (open carnations are equally as suitable); sheer ribbon; decorative wire; glue gun.Method
- Cover the cornet with the sheer ribbon by gluing the end of the ribbon at the base of the cornet and slowly and evenly winding it up towards the top. Cut the end and secure by tucking it inside the cornet and gluing it in.
- Cut a length of decorative wire and blue the end to the bottom of the cornet and twist upwards tuck inside the cornet and glue to secure
- Place a small strip of florabond inside the edge of the cornet and cut, round off and slightly dampen a piece of floral foam to fit. This should rise at least three inches above the cornet. Push the foam into the top of the cornet securely.
- Add a small ring of feathers into the base of the floral foam and start placing the roses to fill the foam
- If you are going to hang this design over a chair of pew end you can create a ribbon “hook” which can be glued or stapled into the cornet for hanging. If you want to hang it from thin wire then you really need to secure a proper hook into the cornet.

Re: Using Floral Foam
Hi im making wreaths and centre pieces using wet foam...my problem is that the foam still drips when I've done my arrangement...is it best to…
Re: Create Longer Lasting Floral Displays
Hi All! Do Alstroemerias last in an oasis arrangement? Please advise. Many thanks and sunny greetings Kris
Re: Create Longer Lasting Floral Displays
Hi I am doing an underwater display with silk red roses covering all roses with the water adding wax chystals on the…
Re: Create Longer Lasting Floral Displays
How many chrysants do I need for a DAD tribute when purchasing 20 stems per bunch. Thanks Treez
Re: Create Longer Lasting Floral Displays
I was wondering if I could make my arrangement with floral foam self watering by adding cotton string to a reservoir…
Re: Create Longer Lasting Floral Displays
Hi I am making son and brother funeral flowers using chrysanthemums the funeral is on a Friday will it be OK to make…
Re: Create Longer Lasting Floral Displays
I have heard that England was going to bane oasis and had a new black oasis that was more environment safe. Do you…
Re: Create Longer Lasting Floral Displays
I heard there is new oasis that's black and better for the environment. Can't seem to find it. Can you help?
Re: Creating a Victorian Posy
Hi, carrying out a little research, on Posies, due to the book I am writing concerning a Victorian Gent of the 1800's. Yes he had…
Re: Create Longer Lasting Floral Displays
Hi i haven’t done any funeral wreaths before, but wanted to do the DAD letters, as my dads just died. I have watched…