
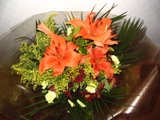
 supermarket for under £10 – and this is very stiff competition for a florist. But what will set your bouquet apart from theirs is the type of flowers used and the care that has gone into it. You want to be able to make a well crafted bouquet with good quality flowers that last.
If you just want to make a bouquet for a friend or relative and not for commercial gain taking time to discover what flowers they like and what colours they prefer will ensure that the end result is more than appreciated.
supermarket for under £10 – and this is very stiff competition for a florist. But what will set your bouquet apart from theirs is the type of flowers used and the care that has gone into it. You want to be able to make a well crafted bouquet with good quality flowers that last.
If you just want to make a bouquet for a friend or relative and not for commercial gain taking time to discover what flowers they like and what colours they prefer will ensure that the end result is more than appreciated.
 Once you have perfected the technique hand-tied bouquets are very easy to make and if done correctly can simply be placed in a vase without any other arranging needed.

How to Create a Basic Hand-tied Bouquet
Any flowers with a reasonably long stem can be used for this type of bouquet. Be wary about using flowers such as tulips or daffodils in the spring as they have very fleshy stems and can bend or break easily.
Ideal flowers include: lilies, alstromeria; carnations, chrysanthumums; roses; strudy gerberas, asters, September. Ideal foliage and filler includes: eucalyptus; ruscus, ivy; bear grass; solidago; euphorbia; leatherleaf, palm, hosta; begonia leaves; asparagus fern.
Materials
Four stems of filler i.e. solidago; one stem of Asiatic lily; three stems of spray chrysanthemums; three stems of alstomeria; bunch of spray carnations; foliage i.e. plam leaves or similar such as fern; binding cord; tape; ribbon and cellophane ( for packaging if required)
Your situation may be slightly different. ask a question below ↓ and our editorial team will reply with our advice.
Method
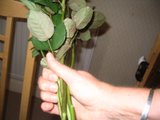
- Lay out the flowers, foliage and filler; cut string to tie the bouquet and make a bow
- Take the Asiatic lily and a piece of filler and place them together to create a focal point
- Start adding filler i.e. solidago, in a clockwise direction at an angle. Hold the bouquet lightly in one hand so that the materials are supported between the thumb and the forefinger
- Place three sections of spray chrysanthemums in a clockwise direction at an angle while at all times holding the bouquet lightly in your hand and keeping the stems going in the same direction. This is tricky but practice does make perfect in this case!
- Add more filler in sections and then put in the alstromeria in three equal sections around the bouquet before adding even more filler
- Place the spray carnations in three equal sections while again still holding the bouquet lightly and turning it as you add the materials in at an angle
- Finally add the palm leaf (five pieces) as a “frill” around the bouquet
- Carefully tie it with pre cut string and bind this for added security with tape before cutting the stems to the required height – and at the same level. You can test this by seeing whether the bouquet will stand up by itself.
Packaging
- Cut the cellophane and place the bouquet on its side upon it then pull up one side of the cellophane to cover the bouquet and tuck it around and secure with sellotape.
- Repeat this with the top edge of the cellophane coming to just the top of the bouquet
- Tie with your ready made bow which should complement the colours in your bouquet.


Ask Floristry Expert a question
Ask our editorial team a question and we will reply with our advice. Tell us as much about your situation as you can: the more detail you give, the more useful our answer can be.
You do not need to use your real name. Please do not include your full address, phone number, email address, or the names of other people. We may edit or remove identifying details for privacy and legal reasons.
Comments are moderated before publication.