Corsages and Buttonholes

Weddings these days – literally anything goes. You are only ever limited by your imagination. Designs are so innovative and dazzling and thanks to a wide range of accessories now available the world is literally your oyster. What have remained stable though are the traditional adornments – buttonholes and corsages. Grooms and guests can still be seen wearing buttonholes – even though the designs may have moved on! While a beautiful, dainty handcrafted corsage is still very much in evidence with mother of the bride or groom.
Buttonholes
- Buttonhole - usually one large flower with a small amount of foliage
- Boutonniere – usually a bunch of small flowers grouped together
- Buttonholes are not very difficult to make, but if you need to make dozens of them then you need to choose a flower which is hard wearing and can be made up the night before.
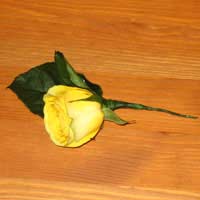
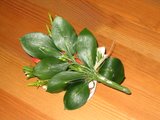
 Carnations are ideal for this. The groom’s buttonhole can be made up on the day and traditionally should be taken from the bride’s bouquet to symbolise sharing.This is not obviously cast in stone but the groom’s flower should generally echo what’s in the bride’s bouquet. It should be placed on the lapel of the groom’s jacket. You can accessorise it with feathers, beads or wire and ribbon for added interest.
![]()
Creating a Buttonhole
- MaterialsOne rose; foliage (rose leaves are ideal); wires; tape; pins (for attaching buttonhole to clothing)
Method
- Lay out rose, foliage, wires, tape and pin.
- Remove the rose’s stem just beneath the seedbox and insert the wire (a 0.71mm) into the stem and into the seed box. You can insert two wires in a cross through the seed box to make it sturdier and prevent the rose from drooping
- Loop these wires round twice and bind with floral tape
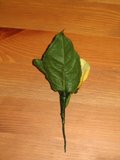
- Take foliage (I used two rose leaves directly on top of each other to give stability to the buttonhole.) and delicately wire the rose leaves using silver wire ( a 0.32mm) making a small stitch either side of the main vein of the leaf and creating a loop
- Secure the leaf stem by gently taking the wire end and wrapping it twice around the remaining wire. Tape the leaf stem securely
- Place the taped leaf behind the rose and secure with green wire
- Wire stems are cut to length then use tape to bring the buttonhole together ensuring that the cut ends are covered.
Corsage
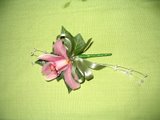
 A corsage is traditionally worn by women for formal occasions such as weddings, balls etc. It can be a beautiful accessory which adds glamour and interest to any outfit. Although it is usually worn on the shoulder, it is actually very versatile and can also be attached to handbags, prayer books, wrists, belts or coat lapels. The design should be very lightweight and easy to attach. If it is to be worn on clothing then keep in mind the type of cloth it will be attached to. Some fabrics are very delicate and will droop or rip if the corsage is too heavy.Generally flowers used include: roses, orchids, gerberas, freesias, lilies, heathers and alstromeira and foliage is usually .ivy wax flowers, hebe, eucalyptus, hard/soft ruscus and bear grass.
![]()
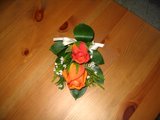
- MaterialsTwo roses; wax flower; hard ruscus; narrow satin ribbon; wires; tapes; pins to attach (magnets can be used)
- Method
- Lay out all you materials and then make a small bow
- Insert wire through the seedbox of each rose - you can insert two wires in a cross through the seedbox to make the rose sturdier. Loop theses wires just twice before binding the wires and stems of each rose with floral tape
- Take the foliage (I used hard ruscus) and wire and stitch each leaf (usually about nine). Bind all leaves.
- Take the wax flower and cut off small sections. Wire each section and bind with tape
- Tape together three of the foliage leaves to form the outline of the corsage. Without binding yet add one rose to these leaves directly in front of them. Add a leaf either side of this and add pieces of wax flower either side
- Add the second rose. In front of the second rose add another piece of wax flower and place your satin bow beneath this before placing a leaf beneath facing outwards.
- Bind everything together in one single stem .Cut stem to required length (should not be too long)

- Once it is all bound together gently lift up the second rose so it is looking slightly upwards at an angle from the first one.
Related Articles in the 'Celebration' Category...
- Flowers for Baptisms and Christenings
- First Communion Flowers
- Creating Topiary Centrepieces
- Easter Flower Arrangements
- Modern Florals for Valentine's Day
- Coloured Flowers for Anniversary Dates
- Lunar New Year Arrangements
- Wedding Flower Arrangements
- Creating a Victorian Posy
- Creating a Bridesmaid's Bouquet
- Creating a Floral Head Decoration
- Creating a Bridal Bouquet
- Table Garlands
- Chair Back Floral Decorations
- Floral Table Centre Pieces

Re: Using Floral Foam
Hi im making wreaths and centre pieces using wet foam...my problem is that the foam still drips when I've done my arrangement...is it best to…
Re: Create Longer Lasting Floral Displays
Hi All! Do Alstroemerias last in an oasis arrangement? Please advise. Many thanks and sunny greetings Kris
Re: Create Longer Lasting Floral Displays
Hi I am doing an underwater display with silk red roses covering all roses with the water adding wax chystals on the…
Re: Create Longer Lasting Floral Displays
How many chrysants do I need for a DAD tribute when purchasing 20 stems per bunch. Thanks Treez
Re: Create Longer Lasting Floral Displays
I was wondering if I could make my arrangement with floral foam self watering by adding cotton string to a reservoir…
Re: Create Longer Lasting Floral Displays
Hi I am making son and brother funeral flowers using chrysanthemums the funeral is on a Friday will it be OK to make…
Re: Create Longer Lasting Floral Displays
I have heard that England was going to bane oasis and had a new black oasis that was more environment safe. Do you…
Re: Create Longer Lasting Floral Displays
I heard there is new oasis that's black and better for the environment. Can't seem to find it. Can you help?
Re: Creating a Victorian Posy
Hi, carrying out a little research, on Posies, due to the book I am writing concerning a Victorian Gent of the 1800's. Yes he had…
Re: Create Longer Lasting Floral Displays
Hi i haven’t done any funeral wreaths before, but wanted to do the DAD letters, as my dads just died. I have watched…